

Cleat Key review – Improve efficiency and reduce injury risk with a simple tool
It’s a bit early for Crowdfunding Monday, but this is an exciting campaign, and early-bird is almost gone, so read on now and grab the Cleat Key at a discount!
Getting a professional bike fit is recommended for beginning cyclists or those who experience pain when cycling. It is good that hardly anyone questions the impact a professional fit has on well-being and performance. It is costly but well worth it. A good bike fit will include the position of handlebar, saddle, type of saddle, and crank arm length and look at another critical contact point through which all force travels – that is, your foot.
Here is where the Cleat Key comes in: It helps you set up your cleat’s position correctly by giving you a tool that is usually only available to professional bike fitters. It works with all Look-type and Shimano SPD-SL (road-type SPD) cleats.
Your cleat can be adjusted in the front-back direction, sideways (limited), and in its angle. The angle is often overlooked, but one of the most important aspects of a proper cleat set-up is that we all have different natural foot angles, even between our left and right legs. The Cleat Key makes setting up the cleat at the correct angle super simple, and together with the instructions on their website on front-back positioning, you will now be able to set up your cleats perfectly every time.

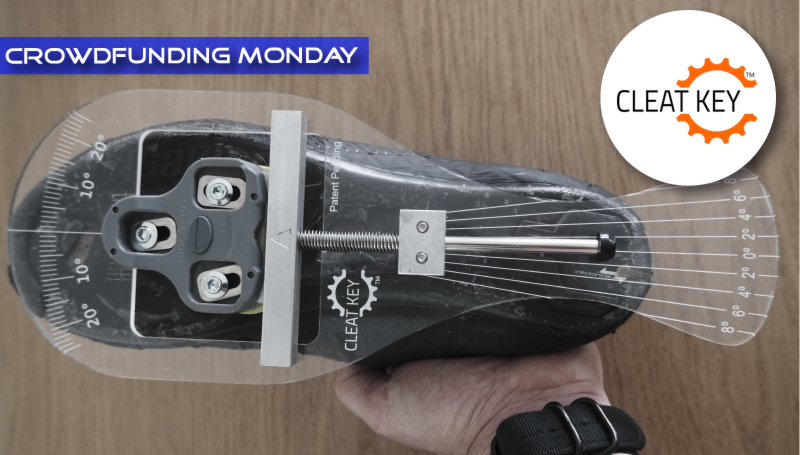
The Tool
Antony Pringle, the founder of the company behind the Cleat Key, has been fitting people on bikes since the mid-80s, among them world-class athletes. Not happy with the available tools to fit cleats (they are either costly and unnecessarily complex or cheap and too simple), he developed his own device and has refined it through countless fittings. It has been used to set up cleats for hundreds of cyclists already.
The Cleat Key is well constructed out of 6061 Aluminium and PMMA, an acrylic also known as Plexiglas. It looks and feels sturdy and premium. The aluminum piece is attached to the clear acrylic central part by two screws through what looks like 1mm thickness after accounting for the screw retraction, so it might be best not to throw it around viciously (keep away from violent toddlers). The acrylic part has two sides that act as protractors, one to measure your foot angle (more on this later), and one to set up the correct angle for your cleats. The aluminum part attaches the tool to your cleat.
The Use
The cleat fitting process consists of two parts: 1. determining the correct front/back position of your cleats and 2. determining your foot angles and transferring those onto your shoes.
Part 1 is done without the tool: Follow the instructions on their website or their video on how to find the metatarsal bones of your feet and draw lines on the bottom of your shoe. If the cleat is centered on the metatarsal line, your front-back position is neutral – or in the traditional position. Triathletes, for example, often prefer to position the cleat further back. By following the instructions, you can make sure the position of your cleat is always the same, no matter which shoe you are using.


Part 2 is where you will need the Cleat Key. But first, you need to determine your natural foot angles. You do this by jumping up over a straight line on the floor and then taking note of the angle at which your feet land. To transfer these angles onto your shoe and cleat, you need to divide them by three, as feet under load have a reduced optimal angle. This is explained on their website, should you be interested in further reading.


I was interested in how consistent, and replicable the jump test results are, so I jumped and measured the angle four times for each foot, trying to be reasonably accurate. I did have some variations in the results, but they were pretty close together except for one outlier.

Determining your foot angle is already the most complicated part of the setup: Dividing by three and then placing the tool onto your shoe to push the cleat into the correct angle is straightforward. I used a stopwatch to measure the time needed for the whole process. The first shoe took 25 minutes, as I needed to navigate to the website, read the instructions, get a pen and tape and pay close attention not to make any mistakes. The second shoe was done in 5 minutes, and in case of any new cleats or shoes, it will be done even faster, as I won’t need to measure my foot angles again.

The Campaign:
Crowdfunding campaigns come with an inherent risk: You are not buying a product, but you are funding the development and production thereof and get the product as a reward. Thus if the campaign successfully gets funded but fails to deliver, you are out of luck. In the case of the Cleat Key, this risk is very low: The product is straightforward, and the development is completed. A clear thumbs up! As of today, the campaign has already exceeded its funding goal. A few early-bird discounts are still available, so if you are interested, quickly head over to Kickstarter via the link below.
Wrap Up
The tool is straightforward and gives you the ability to do an essential part of bike fitting at home. I have looked at alternatives on the market but could only find very expensive ones aimed at bike fitters and a couple of other tools that either did not provide any way to account for foot angle or were complicated to use. The Cleat Key fills a gap. It is not cheap at USD 89, but it’s money well spent, and sharing one tool among friends makes it worth it.
Got any feedback or questions? Please comment in the section below!


